Apricot Rum Balls

_MG_3483

I don’t know how it happened, but the last time I posted was 6 months ago. At the time we were in the depths of winter and I was longing for summer. Now I wish I’d kept my mouth shut. Last night gifted us a delicious cool change with the works – rain, lightning, thunder. My first thoughts upon the arrival of a cool change and the promise of some mild weather – “finally I can use my oven again”.

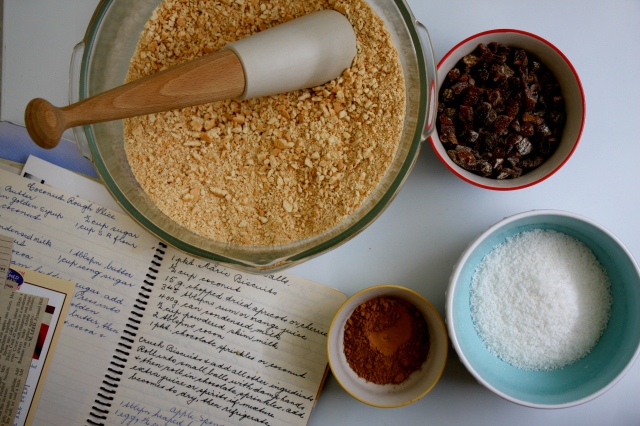
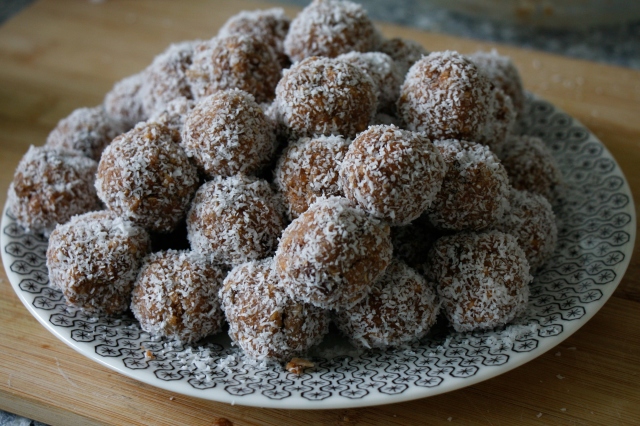
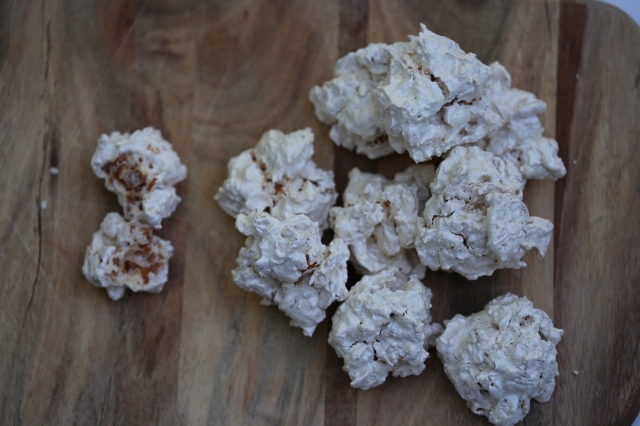
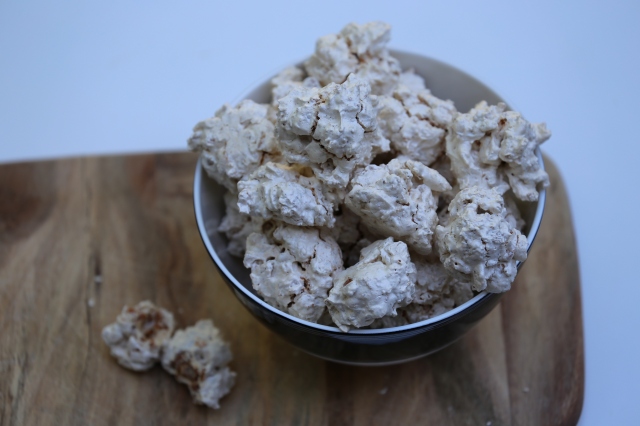
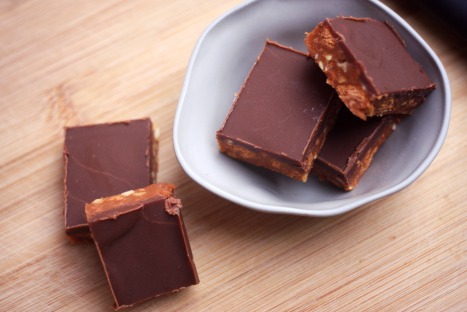
But today I bring you some treats that require no oven, so they really are perfect when you find yourself threatened by 3 more days of stifling heat. I’m pleased to announce also that Nana’s Famous Rum Balls just got jazzy! These are as solid as the old favourites but studded with delicious apricot gems. Eating these brings back wonderful memories of sitting in Nana’s kitchen after the long drive to see her. We would always be greeted with a tray of rum balls or slice.

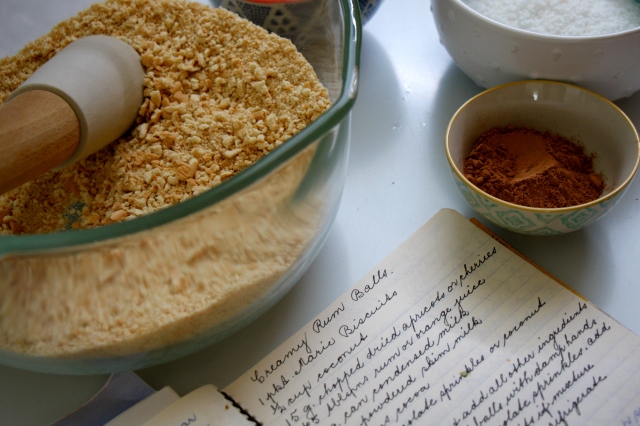
I must make a note about the recipe to follow. I like to think of myself as a resourceful cook (read lazy). This recipe asks for half a cup of skim milk powder. The use of this no doubt gives these rum balls an extra kick of creamy, but I wasn’t going to go to the shops to buy a 2kg bag of skim milk powder which would then guilt me from the cupboard for the next 3 years. Instead I replaced this with a little extra coconut and some flour to reach the required consistency. I do however, applaud anyone who actually follows the recipe.

_MG_34901

You will need:

  • 1 packet Marie Biscuits
  • 1/2 cup desiccated coconut
  • 150g chopped dried apricots (or cherries etc. get creative!)
  • 3 to 5 tablespoons of rum or orange juice (3 is probably enough. . .)
  • 400g can condensed milk (I used some fancy coconut condensed milk)
  • 2 tablespoons cocoa
  • 1/2 cup powdered skim milk *
  • Desiccated coconut or chocolate sprinkles for rolling

Do this:

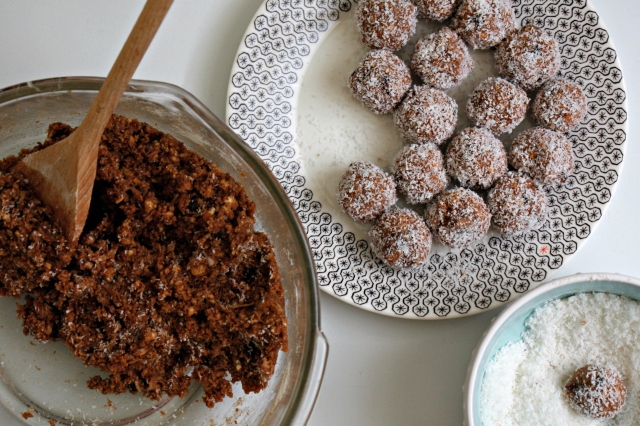
  1. Crush biscuits. Think of this as cheap therapy. (I use a big bowl with a pestle, but the internet is full of other methods. Some of these are more therapeutic than others).
  2. Into a large bowl add the crushed biscuits to all the other ingredients.
  3. As I’ve noted below I added my powdered skim milk substitutes last to achieve the texture I wanted. You don’t want an overly sticky mixture, but you still want the coconut to stick to the outside of the balls.
  4. Roll into small balls with damp hands if you please.
  5. Roll in sprinkles or coconut.
  6. Add a little extra orange juice or rum if the mixture becomes too dry.
  7. Refrigerate. (These rum balls keep for yonks in the the fridge. As I write this I’m eating one that I made almost two weeks ago).

*As mentioned above I didn’t have any skim milk. Instead I made up about 1/2 a cup with a little desiccated coconut, a touch extra cocoa and some flour. I added half of this to start with and then more slowly to make up a rollable, but slightly sticky texture. The taste was still great.

_MG_3484

_MG_3486

Posted in Biscuits, Cakes and Slices | Tagged , , , , , , , , , , , , | Leave a comment

Ginger and Coconut Slice

It turns out it’s winter. More accurately, the deep dark depths of winter. I’m cold. My house is damp. My clothes are desperately trying to host a colony of mould that appears in need of a home – I wish I was kidding. I’m dreaming of warm summer days, light floral dresses, lots of obnoxious laughter….

I made this slice when my friend Cas came to visit Melbourne from New Zealand. It was the last bbq of the summer. We set a picnic rug on the banks of the Yarra River and watched the sun set behind the city sky scrapers. It was perfection. So this slice is a bid for both Summer and Cas to come back.

You will need:

  • 60g butter
  • 1 tablespoon golden syrup
  • 1 cup self raising flour
  • 1 1/2 teaspoons ground ginger
  • 1/2 cup sugar
  • 1/2 cup coconut (desiccated)
  • 1 egg

Lemon Icing:

  • 1 cup icing sugar
  • 30g butter
  • 1 teaspoon lemon juice
  • 1 teaspoon hot water

Do this:

  1. Preheat oven to 180c.
  2. Melt butter and syrup over low heat.
  3. Sift flour and ginger, combine with sugar, coconut and lightly beaten egg.
  4. Pour in melted butter and golden syrup. Mix.
  5. When well combined, press into a greased (and lined) 28cm x 18cm (11in x 7in) lamington tin.
  6. Bake for 25 to 30 minutes – but keep an eye on it! Mine was ready a little earlier than this!
  7. While cooling, make the lemon icing (see below).
  8. When cool, spread with lemon icing and cut into fingers.

Lemon Icing:

  1. Sift icing sugar into bowl.
  2. Combine butter, lemon juice and hot water. Stir until butter melts.
  3. Mix butter mixture into icing sugar, beat until smooth.

IMG_2941

IMG_2950

Enjoy while reminiscing about warm, sunny days!

Love K & K

Posted in Cakes and Slices | Tagged , , , , , , , , , | Leave a comment

Lamb Shanks with Beans

IMG_3058edit

Oh hey there winter. I’ve been waiting for you. My woolly socks are tucked under my pillow for any fresh nights. My hot water bottle is beside the bed waiting to be filled up. I have a host of t.v. series to binge on should the weather impose it. And I dug those lamb shanks out of the freezer.

Nothing shouts “winter’s here” like lamb shanks. I buy them on special and then tuck them in the freezer ready for a chilly weekend slow cook. Which was where I found myself a couple of weeks ago. I was cold and desperate for some meat that was falling off the bone. I stumbled across the following recipe in one of Nana’s books. The recipe calls for a can of cannellini or butter beans. I buy dried beans in bulk and then cook them as I need them, so followed the following method (this makes approximately 2 – 3 cups of cooked beans – I use what I need and freeze any extra or use it to make dips):

  • Soak beans overnight in plenty of water
  • Next day, drain rinse and cover with fresh water in a saucepan
  • Bring to the boil
  • Reduce to a simmer (I also skim off the foam that forms on top)
  • Simmer until beans are tender (the time will depend on the type of bean – but is usually between 1-2 hours)
  • Top up the water if required (there shouldn’t be much left at the end of cooking)
  • Add a little salt at the end of cooking if you like

And for the delicious lamb shanks?

You will need:

  • 6 lamb shanks
  • 1 tablespoon plain flour
  • 1 tablespoon paprika
  • 30g butter
  • 400g can chopped tomatoes
  • 2 cups water
  • salt and pepper
  • can butter or cannellini beans
  • 2 tablespoons chopped parsely
  • 2 teaspoons worcestershire sauce

Do this:

  1. Combine flour, paprika and salt. Toss shanks in mixture.
  2. Melt butter in large pan. Add shanks and cook in a single layer until brown all over.
  3. Add tomatoes and water. Cover and bring to boil.
  4. Reduce heat and simmer, covered, for 1 1/2 – 2 hours or until shanks are tender.
  5. Season with salt and pepper.
  6. Add drained and rinsed beans (I add mine just before the end of cooking time).
  7. Add parsley and worcestershire sauce.

Note: I make this recipe the day before, then put it in the fridge overnight. Then the next day, before reheating, I skim off the excess fat that forms on the top of the sauce.

Stay warm!

Love K & K xx

Posted in Main Course | Tagged , , , , , , , , | 3 Comments

Cornflake Meringues

_MG_9774

One of the things I love about Nana’s books is flicking through and finding little handwritten recipes from other people. I happened across the following recipe yesterday while flicking through and it came at a perfect time. Mum and I had made a big batch of delicious lemon curd during the week and were left with a few lonely egg whites. Not wanting to waste anything that could be turned into something delicious they sat looking hopeful in the fridge for a couple of days (the internet says you can keep them in the fridge for 2-4 days). And then I stumbled across the recipe for Cornflake Meringues.

This is such a simple recipe. 3 ingredients and minimal effort. It comes from Betty, who Mum and I have concluded must be Betty McGillivray (hello to all you McGillivrays). On a side note (and I think I’ve given them a plug before) if you ever happen to pass through Gunbower, please do yourself a favour and visit McGillivray Meats. You will never have a better sausage. Ever.  Find them here.

Anyway, back to cornflake meringues.  You’ll see in the original recipe that normal sugar has been used. I was a little hesitant at first, thinking perhaps the assumption was that I should know that castor sugar was what was meant. But the result was delicious.  These tasty morsels are an initial blast of sweet. But that is quickly followed by a lovely lightness that causes any residual sweetness to disappear. The result is a light, crunchy morsel.j

You will need:

  • 2 egg whites
  • 3/4 cup sugar
  • 3 1/2 cups cornflakes

Do this:

  1. Preheat oven to 150 fan forced.
  2. Beat egg whites until stiff (I used the whisk attachment for all steps).
  3. Add sugar gradually.
  4. Blend in cornflakes.
  5. Place teaspoonfuls on a prepared tray.
  6. Bake for 45 minutes.

IMG_9779

IMG_9783

The note then says ‘Good Luck, Betty’.

I promise you won’t need luck though.

Love K & K xx

Posted in Biscuits | Tagged , , , , , , , , , | 1 Comment

Ginger Pud for Pud

It’s been a bit quiet on here lately.

I’ve been putting off writing this post for months, initially thinking about what to say and then life happened. When it comes down to it though, nothing I can say can do the man justice.  So put simply, this pud is for Pop, who was fondly known as Pud.

11050127_10206231303364836_6775569302112938236_n

11163808_10206239051078524_3223695114063701861_n-3

I can say without hesitation that Pop is the most down-to-earth, genuine and patient man that I have had the privilege to know. It didn’t matter who you were, Pop would treat everyone with equal respect and never uttered a bad word about anyone. He was a community man and loved Gunbower so dearly. He is the kind of person the world so desperately needs more of. I love him more that I can express and miss him so terribly, even despite the months that have passed.

But Pop would hate to dwell on this, so down to business. Pop really, truly appreciated a good pud.  He would always say yes to dessert and I would always be the one to join him.  I have fond memories of us digging Neapolitan ice-cream out of the tub and heaping stewed fruit on top as if we may never eat again.

So this Steamed Ginger Pud is for Pud. Enjoy it – he would!

You will need:

  • 1 1/2 cups of flour
  • 2 tablespoons of butter
  • 1 teaspoon bi-carb soda
  • 2 teaspoons ginger (I assumed this was the powdered variety)
  • 3/4 cup treacle
  • 1/2 cup warm water

Do this:

All Nana says is – Mix all tog. Steam 2 hrs. (Slightly cryptic for those of us who’ve never made a steamed pud before).

So I consulted Mother Dearest and did this:

  • Mixed all the ingredients together (I even sifted the flour – Mother Dearest was watching).
  • Greased a 2 litre pudding bowl and spooned in the mixture.
  • Covered the pudding bowl with a clipped lid (or you could do this with foil tied around the bowl with some string).
  • Placed the pudding bowl in a large saucepan of simmering water which goes approximately 3/4 of the way up the pudding bowl.
  • Steam for approximately 2 hours.
  • Serve warm with custard if you please.

This pud was delicious. So delicious that I was unable to take a snap before it was all gobbled up! So instead I’ll leave you with young Harry and Pop riding a tractor. . .

13704319_1639645993029741_49501134_n1

Happy Cooking!

Kath and Kate xx

Posted in Cakes and Slices, Dessert | Tagged , , , , , | 3 Comments

Muesli Slice

IMG_11582

I have a tendency to bake to clear my head. In these moments it is not fiddly, wordy recipes that I crave, but those that with just a few steps and a good dose of stirring. Which is how the muesli slice fell into my lap late last night. It struck me as good timing given that school goes back tomorrow. I’m sure that if you trawl the internet you will find a dozen that are more fancy, fruity, ‘nutrient dense’, but this one is simple and delicious.

Simple is a word that keeps coming up when I write about Nana’s recipes. My Nana and Pop had it right in life. They kept things simple. No fuss, no drama. They had an appreciation of life’s simple joys. And this is what I felt, late last night, with Simon helping me measure sultanas and stir the pot on the stove. It was a moment of joy brought about by a muesli slice. A joy more satisfying that any screen could bring me.

You will need:

  • 125g butter
  • 1/2 cup brown sugar
  • 1 cup rolled oats
  • 1/2 cup wholemeal self raising flour (I used plain wholemeal and added a teaspoon of baking powder)
  • 1/2 cup honey (I ran out, so used half honey, half maple syrup)
  • 1 1/2 cups fine desiccated coconut
  • 1 cup sultanas

Do this:

  1. Grease a 19cm x 29cm slice tin. Preheat oven to moderate (180c).
  2. Combine butter, honey and sugar in a saucepan. Stir over low heat without boiling, until butter has melted and sugar is dissolved.
  3. Combine remaining ingredients in a large bowl, add butter mixture and mix well.
  4. Press mixture evenly into prepared tin, bake in moderate oven for about 20 minutes (or until golden).
  5. Cool in tin before cutting into squares.
IMG_11572

Resist temptation…let it cool!

IMG_11612

Love Kath and Kate x

Posted in Cakes and Slices | Tagged , , , , , , , , , | 1 Comment

Malt Biscuit Slice

It’s getting cold. The kind of cold that keeps me snuggled in my winter coat while I do chores around the house. It must look ridiculous to see someone wearing a winter coat while vacuuming, washing dishes. . . cleaning the shower. So one may assume that I have been busy cooking lovely winter stews and warm puds. When in truth, I have discovered a humdinger of a no-bake, fridge slice. Oh boy it’s good.

IMG_11301

You will need:

  • 90g butter/dairy free alternative
  • 1/2 tin sweetened condensed milk
  • 2 teaspoons golden syrup
  • 1 packet malt biscuits
  • 1/2 cup unsalted peanuts
  • 90g softened butter/dairy free alternative
  • 90g chopped milk chocolate, melted

(I may have gone off script a little. . .I replaced the condensed milk with a soy version and it tasted ace. You can also use gluten free biscuits if you need. When it came to the topping I ran out of butter, so used about 25g coconut oil.  I also replaced 30g of milk chocolate with dark chocolate to make it a little less sweet).

Do this:

  1. Gently melt butter, condensed milk and golden syrup together.
  2. Add crushed biscuits (I put mine in a bag and belted them with a rolling pin – feels good) and peanuts.  Mix well. It may seem a little runny. Don’t panic though, it sets unnervingly quickly.
  3. Press mixture into a shallow slice pan about 18cm x 28cm and refrigerate.
  4. When cold, spread with icing made by mixing together butter and chocolate.

slice collage

A few notes. I am a lazy cook by nature. Without exception I always attempt to melt my chocolate in a saucepan over a direct flame. Without exception this always fails. Some part of me wants to prove that it can be done. Don’t bother, it’s a waste of good chocolate and money. Do it the right way by putting your chocolate in a heat proof bowl over a saucepan of simmering water. Make sure the bowl doesn’t touch the water and that it fits snuggly in the pan. Stir the chocolate with a metal spoon.

This slice ideally needs to be kept in the fridge. It doesn’t set as hard as you might expect, but this isn’t a problem when it is cool. If you want your slice to be a little more sturdy you could decrease the amount of condensed milk or add a little more biscuit.

IMG_112811

This slice is so quick and easy to make. And so delicious. No doubt it will become a regular in my house.

Love Kath and Kate x


Posted in Cakes and Slices | Tagged , , , , , , , , | 4 Comments

Chocolate Fruit Slice

Today is Mother’s Day in Australia.  It’s not a day that has traditionally been given a huge amount of attention in my family. Not because we took our darling mother dearest for granted, but more because she never really bought into it. Mother dearest is gallivanting around South Gippsland somewhere today and I do hope she’s having a lovely day. But today made me think about Nana too. I felt a terrible ache for her today. It’s amazing how vividly you can remember small things like someone’s smell, the feel of their skin, or how it felt to hug them. All of these things came flooding back. So here’s a no fuss slice, for my lovely no fuss Nana.

IMG_08632

You will need:

  • 1 cup self raising flour
  • 1 teaspoon mixed spice
  • 3/4 cup sugar
  • 1 cup mixed fruit (I used whatever I had in the pantry – sultanas, apricots, figs – chop up if needed)
  • 1/2 cup coconut
  • 1/2 cup choc bits
  • 2 eggs, lightly beaten
  • 1 tablespoon sweet sherry
  • 90g butter melted

Do this:

  1. Sift flour and spice into bowl, mix in sugar, fruit, coconut and choc bits.
  2. Stir in combined eggs, sherry and butter.
  3. Press mixture evenly over base of well greased (and lined) 23cm square slab tin.
  4. Bake in moderate oven (180c) for 25 minutes or until just firm to touch.
  5. Stand for 10 minutes before cutting, then remove to wire rack to cool.
  6. Dust with a little icing sugar.

IMG_08542

IMG_08682

This slice begs to be enjoyed with a cup of tea. I hope someone’s baked you something special for Mother’s Day.

Love Kath & Kate xx

P.s. Carlton have just won three in a row Nan 😉

Posted in Cakes and Slices | Tagged , , , , , , , , , , , | 1 Comment

Caramel Walnut Slice

I have had a little less time to devote to testing Nana’s recipes recently. All my free time has been spent at my parents house giving the two new kittens hugs, and watching them chase pipe cleaners and jump at shadows. It’s been incredibly difficult to get anything else done really. I mean, look at those faces. . .

But I did make this tasty Caramel Walnut Slice. This is not your fudgey, creamy sort of caramel slice. But it is your darn delicious sort of caramel slice. And, it’s easy enough to make late on a Thursday evening when you’re finding it pretty hard to keep your eyes open.

You will need:

Base

  • 1 cup self-raising flour
  • 1/2 cup sugar
  • 1 cup desiccated coconut
  • 125g (4oz) butter

Topping

  • 2 eggs
  • 1/2 teaspoon vanilla
  • 1 cup desiccated coconut
  • 90g (3oz) walnut pieces
  • 1 and a half cups brown sugar, lightly packed
  • 1/2 teaspoon baking powder

Do this:

Base

Sift flour into bowl, add sugar and coconut. Mix well.
Melt butter over low heat. Add to dry ingredients. Mix well.
Press mixture into greased (and lined) 28cm x 18cm (11in x 7in) lamington tin.
Bake in moderate oven (180 degrees) for 15 minutes.

Topping

Lightly beat eggs and vanilla with fork.  Add coconut, chopped walnuts, brown sugar and baking powder. Mix well.
Spread mixture over partly cooked base.
Return to moderate oven and bake further 25 to 30 minutes or until topping in cooked.
Cool in tin. Cut into squares.

IMG_1028(1)

My oven tends to run a little too hot. I must admit I did the whole slice panic thing again and probably took the base out of the oven a little early. The base and topping did both brown up more than I expected, so don’t be scared that you’ve over-cooked the slice!

Happy eating!

Kath & Kate x

Posted in Cakes and Slices | Tagged , , , , , , , , | 2 Comments

Watermelon with Gin

IMG_0964(2)

I can’t vouch for the rest of the country, but if you’re in Melbourne or Sydney you could be fooled into thinking it’s still summer. Hopefully if you’re in the northern hemisphere there is a hint of warmer weather coming too. This recipe is perfect balmy evening dessert and it’s darn simple.

Gin is most definitely my poison of choice, and it’s difficult to go past a juicy watermelon so I was excited to make this. I made the recipe a couple of weeks ago and have been meaning to post it. However I must admit that over the weekend I may have slightly over indulged on my poison of choice (I’m looking at you Ella), so writing this is making me feel just a touch queasy. . .

You will need:

  • 1 small watermelon
  • 1 cup gin
  • Mint leaves (I used basil)

Do this:

Cut the watermelon in half, remove the seeds and scoop out balls of the firm flesh with a melon-baller (or cut into cubes).

Place in a bowl, pour the gin over, cover and leave to marinate for several hours in the fridge. (I really like the thought of something marinating in gin!)

At serving time, drain the watermelon well, arrange the balls in chilled glasses, and decorate with fresh mint leaves.

IMG_0958(2)

Enjoy!

Kath & Kate x

Posted in Dessert | Tagged , , , , , , , | 1 Comment